How to create GIFs
You may have already read our guide on why your business should use GIFs on social media but for those of you who missed it, let’s quickly recap:
GIFs (or Graphics Interchange Format) are basically a series of images played in sequence, like a flipbook.
While they’re not always suitable for every type of content, GIFs can be used to liven up posts, drive home a point and add a level of richness and media to otherwise dry content. It also helps you to stand out on social media – adding moving images can really catch the eyes of consumers when they appear in their social feeds.
So now you know ‘why’, let’s delve into ‘how’.
In this guide, we take you through an easy step-by-step approach to creating GIFs and more importantly – how to share them.
Step by step
To create a GIF you’ll first need a series of flat images or a video file to work with. For the benefit of this tutorial I’ll be using Adobe Photoshop.
Step 1: Firstly, you need to ensure each frame of the animated GIF is a different Photoshop layer. To add a new layer, choose Layer > New > Layer. You’ll want to name each layer (by double-clicking on the default layer name) so you can keep track of them easily.

Step 2: Next you’ll need to open the Timeline tool, which will allow you to turn different layers on and off for different periods of time (choose Window > Timeline). The Timeline will let you turn different layers on and off for different periods of time. The Timeline window will appear at the bottom of the screen. Now your static image is halfway to becoming a GIF.

Step 3: On the bottom dropdown menu, click ‘Create Frame Animation’. To add your layers into the timeline you’ll need to first select all your layers you created earlier by going to the top navigation menu and choosing Select > All Layers.
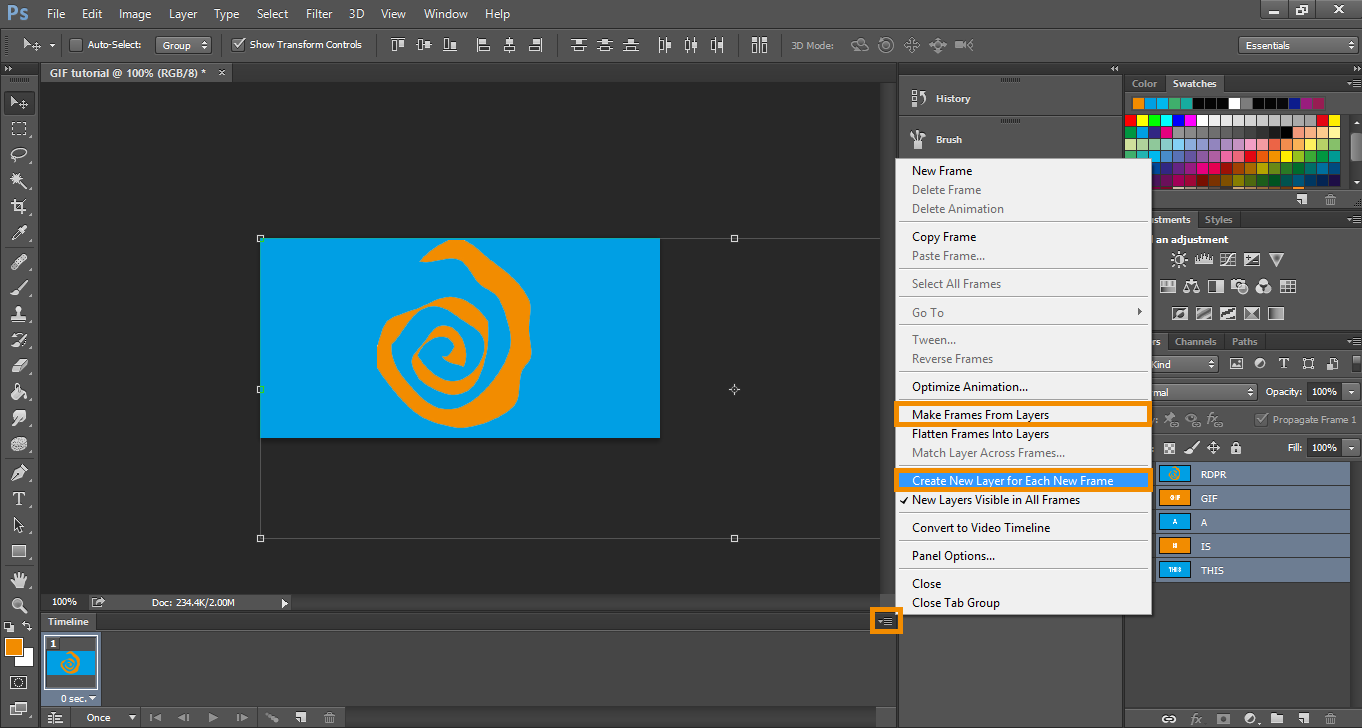
Then, click the dropdown menu icon on the right-hand side of the Timeline screen. You’ll first want to make sure the “Create New Layer for Each New Frame” option is ticked and then click on “Make Frames From Layers” – this will make each layer a frame of your GIF.
Step 4: Now the layers are in the timeline, you need to select under each frame how long it should appear for before switching to the next one.
To do this, click the time below each frame and choose how long you’d like it to appear. In this case, I chose 0.5 seconds per frame.

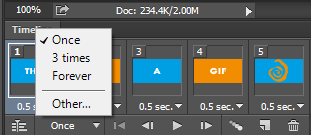
There’s also an option at the bottom of the toolbar to determine how many times you’d like it to loop.
The default will say Once, but you can loop it as many times as you want, including Forever, which will continuously loop. Click Other if you’d like to specify a custom number of repetitions.
Step 5: Preview and save.
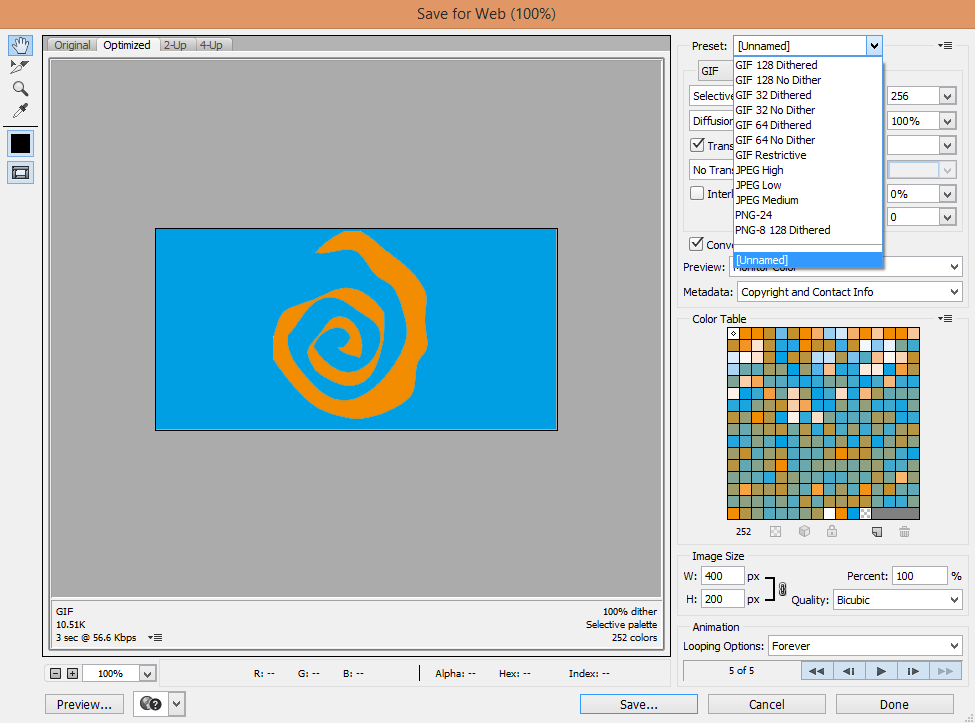
You can preview your GIF by pressing the play icon at the bottom. Once you’re happy with it, it’s time to save by going to the top navigation bar and clicking File > Save for Web.
This will bring up a new pop-up window where you’ll be able to choose the type of GIF file you’d like to save it as under the Preset dropdown.
If you’re unsure on which setting is best for your GIF, check out Adobe’s guide on GIF optimization options here.
TIP: Dithered GIFs will prevent colour banding, whereas if your image uses a lot of solid colours (like ours) you may opt for no dither.
For the benefit of this tutorial I chose the following settings:
- Selective
- No Dither
- Colors: 256
- No Transparency Dither
- Bicubic
And here’s what the final GIF looked like:

Other tools
If you don’t have access to Photoshop, don’t worry – there’s tons of easy, free sites you can use. Some of the most popular include:
One of my favourite tools is GIPHY – not only can you upload your own GIFS to make them shareable (more on that later), GIPHY allows you to create your own GIFs from a video file or YouTube link or create a slideshow from a mashup of your own images.
Sharing is caring
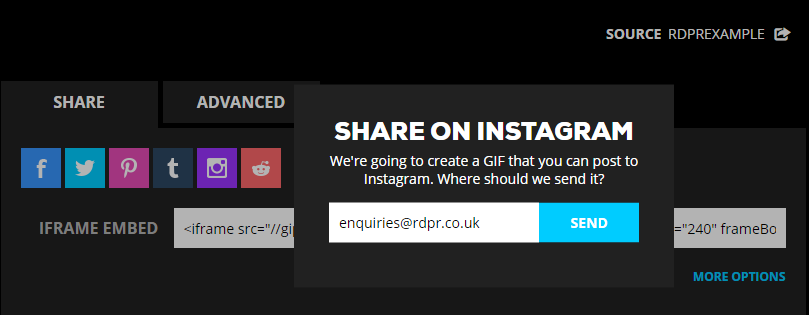
While there are plenty of other online tools, GIPHY is probably the best one I’ve come across that enables you to easily share GIFs across all platforms (I’m not getting paid to promote them, honest!).
By simply uploading your GIF onto GIPHY it gives you the necessary options to share on any platform by just a click of a button. Whether it’s Facebook, Twitter, Instagram, Pinterest, Tumblr, Reddit, text message or email – it does it all for you. There’s even an HTML embed code so you can upload onto your website.
So there you have it. Whether you want a GIF to create original, engaging content, to highlight a point – or simply to add some humour, you now have the tools to create interesting content for you or your business.
But if you need any more advice, get in touch to see how we can help put some spark into your social content – or why not get our attention on Twitter and fire us a tweet with your newly-created GIF? We’d love to see your work!

Related Insights

Selected industry experts bring you insight and expert advice, across a range of sectors.
Subscribe for free to receive our fortnightly round-up of property tips and expertise
Selected industry experts bring you insight and expert advice, across a range of sectors.
Subscribe for free to receive our fortnightly round-up of property tips and expertise